Sometimes it is necessary to crop an image for compositional or presentation reasons.
A website gallery may require images of a certain size, stereo card formats
need images with a specific aspect-ratio if you want maximum image-area.
You can crop in three ways :-
1. Any size and aspect-ratio. (free cropping)
2. Any size but a fixed aspect-ratio. (free cropping with 'keep aspect
ratio' checked)
3. A fixed size and aspect-ratio. (fixed size cropping)
SPM's cropping options allow you to achieve any of the above.
Five fixed-sized cropping options are provided, you may change the default
values in Edit\Preferences\Crop.
A sixth fixed-size cropping option may be specified directly in
Edit\Crop\Custom Cropping.
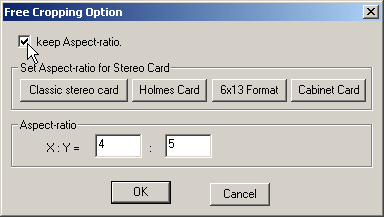
Free cropping allows you to manually enter a required aspect-ratio which
then applies to cropping executed by the toolbar icon, menu selection
Edit\Crop\Free Cropping or pressing the 'B' key.
If you choose one of the buttons Classic, Holmes, 6x13 format or Cabinet Card, SPM enters
the correct aspect-ratio for maximum image area, checks 'keep aspect ratio'
and remembers your selection when you use 'Print Stereo Card'.
By unchecking 'keep aspect ratio' you can define any size of crop rectangle
and SPM will still remember your stereo-card choice when you use 'Print Stereo
Card'.
This allows it to preselect the appropriate print size.
 ...
... ....
....
 ...
...
For Holmes cards, the print size is set to 6"x4", you simply trim-off the top 0.5" and mount on 7"x3.5" card.
For further details see this link.
All the stereo formats are displayed as two side-by-side images and two crop-rectangles are displayed, one over each image and moving in unison.
For fixed-size cropping, if you have not checked the 'Resize to above after cropping' option, crop rectangles of the chosen size will be displayed on the images.
You may then drag them to the desired position.
If the 'Resize to above after cropping' is checked or if you have selected free-cropping, you will be able to use the mouse to position the cross-hairs of the crop-lines at the desired top-left position for the crop-rectangle and then hold-down the Left mouse button.
KEEPING THE BUTTON DEPRESSED drag the cross-hairs to the desired bottom-right position for the crop-rectangle and release the button.
For fixed-size cropping, the crop-rectangle aspect-ratio is determined by the width and height of the selected option.
e.g. if you choose 640x480, the aspect-ratio is 4:3 and you could select an area 800x600.
After cropping, that area will be resized to 640x480.
If the 'Two-stage cropping' option has not been selected in 'Edit/Preferences' the image is cropped-to-size immediately, although the user can 'Undo' the action.
Otherwise,the rectangles positions may then be altered by positioning the 'move' cursor over either one and dragging the mouse with the left button depressed.
On releasing the button, the images will be immediately cropped.
If necessary, you can click 'Undo' to revert to the uncropped images.
'Custom Cropping 0' allows the user to define a crop-rectangle whose width and height also determine the cropping aspect-ratio.
Optionally, you may 'resize' the image to that entered size after doing the 'free crop'.
If you enter 0,0 for the resized image, SPM will use a default value of 640x480.
Five predefined crop rectangles are available :-
| 640 | x | 480 | . | 1 |
| 800 | x | 600 | 2 | |
| 1024 | x | 768 | 3 | |
| 1280 | x | 1024 | 4 | |
| 1600 | x | 1200 | 5 |
Pressing keys '1' to '5' will display the crop rectangles (if they are smaller than the image).
The rectangles positions may then be altered by positioning the 'move' cursor over either one and dragging the mouse with the left button depressed.
On releasing the button, the images will be immediately cropped.
If necessary, you can click 'Undo' to revert to the uncropped images.
The user may custom-define these five rectangles to other values in 'Edit/Preferences'.
Cropping Large Images
It may be necessary to crop large images, such as panoramas, that are larger than the screen resolution.
This may be done accurately by choosing the free-cropping icon from the toolbar and following the procedure below:-
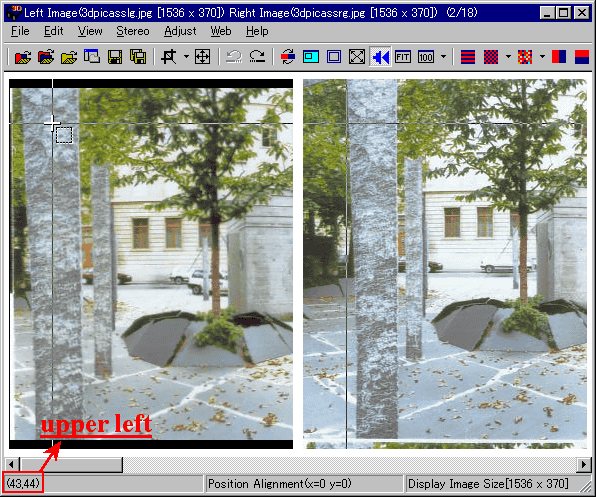
Move the crosshair cursor to the required upper-left position, the x-y co-ordinates are displayed in the status-bar (43,44 in above example).
Press Shift + mouse left-click. The cross-lines will disappear.
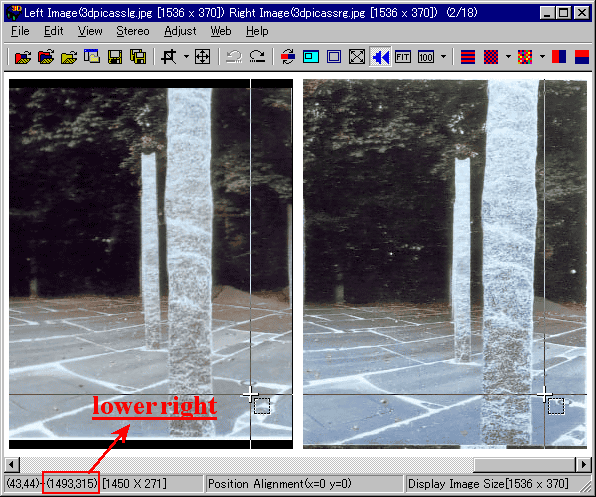
Using the horizontal and vertical scroll-bars, move to the lower-right of the image.
The status-bar displays the starting co-ordinates, ending co-ordinates and the size of the resulting crop-rectangle.
Press the Shift key and move the mouse to display the cross-lines, drag to required position and, with Shift still depressed, right-click.
Ignore the popup context-menu and click on the image to crop it.